Introduction
Spring Cloud Data Flow (SCDF) is a cloud-native orchestration service for composing microservice based applications on modern runtimes. With Spring Cloud Data Flow, developers can create and orchestrate data pipelines for common use cases such as data ingestion, real-time analytics, and data import/export.
Features
- Develop applications using DSL, REST-APIs, Dashboard, and the drag-and-drop GUI - Flo
- Create, unit-test, troubleshoot and manage microservice applications in isolation
- Build data pipelines rapidly using out-of-the-box stream and task/batch components
- Consume microservices written in Java or other languages as docker artifacts
- Scale data pipelines without interrupting data flows
- Orchestrate data-centric applications on a variety of modern runtime platforms including Cloud Foundry, Apache YARN, Apache Mesos, and Kubernetes
- Take advantage of metrics, health checks, and the remote management of each microservice application
Deploying .NET Components to SCDF
Steeltoe Stream enables .NET components to run on SCDF by parsing and acting on the appropriate SCDF configuration parameters and binding the .NET application to the underlying message broker. .NET components built with Steeltoe are interoperable with their Java counterparts giving you the ability to leverage prebuilt components written in other languages (such as Java) and maintained by the Spring Cloud Data Flow team. To learn more about these components, SCDF team has an excellent guide that describes installing and deploying Java based applications on SCDF at the Spring Cloud Data Flow Microsite. We encourage you to get familiar with that content.
This guide is focused on describing how you can deploy .NET based Stream components to SCDF and how you can easily combine them with already existing components written in other languages such as Java.
Steeltoe Stream Processing with Data Flow and RabbitMQ
This section shows how to register stream applications with Data Flow, create a Stream DSL, and deploy the resulting application to Cloud Foundry, Kubernetes, and your local machine.
In the standalone guide we created ISource, IProcessor and ISink .NET streaming components using Steeltoe and deployed them as standalone applications on multiple platforms without using Spring Cloud Data Flow.
In this guide, we describe how you can register these Steeltoe based components with Data Flow, combine them with other Java based components, create a Stream DSL to orchestrate their interactions, and deploy the final application to Cloud Foundry or Kubernetes.
Development
The samples repo has a number of Steeltoe Stream sample applications. For this example we will be using the CloudDataFlowLogToUpperProcessor sample, which implements an IProcessor interface and the CloudDataFlowLogSink sample, which implements an ISink interface.
For an ISource use the HttpSource application available at maven://org.springframework.cloud.stream.app:http-source-rabbit:3.0.1
Spring Cloud team publishes a number of sample applications as maven and docker artifacts at the https://repo.spring.io Maven repository. These pre-packaged applications can be used with Steeltoe Stream.
The Data Flow Dashboard
Assuming Data Flow is installed and running on one of the supported platforms, open your browser at <data-flow-url>/dashboard. Here, <data-flow-url> depends on the platform. See the installation guide to determining the base URL for your installation.
Application Registration
Applications in Spring Cloud Data Flow are registered as named resources so that they may be referenced when you use the Data Flow DSL to configure and compose streaming pipelines. Registration associates a logical application name and type with a physical resource, which is given by a URI.
The URI conforms to a schema.
Spring Cloud Data Flow only supports running .NET applications in Docker images
Data Flow defines some logical application types to indicate its role as a streaming component, a task, or a standalone application. For streaming applications, as you might expect, we use Source,Processor, and Sink types.
The Data Flow Dashboard lands on the Application Registration view, where we can register the source, processor, and sink applications, as follows:

In this step, we register the applications we previously created. When you register an application, you provide its:
- Location URI (Maven, HTTP, Docker, file, and so on)
- Application version
- Application type (source, processor, or sink)
- Application name
The following table shows the applications listed in the Samples:
| App Name | App Type | App URI |
|---|---|---|
basicstreamprocessor |
Processor | docker://projects.registry.vmware.com/steeltoe/basicstreamprocessor:latest |
basicstreamsink |
Sink | docker://projects.registry.vmware.com/steeltoe/basicstreamsink |
This example assumes Spring Cloud Data Flow and Skipper servers are running in your Cloud Foundry environment.
In addition to the samples, register the pre-packaged HttpSource source application. To do so:
From the Applications view, select ADD APPLICATION(S). This shows a view that lets you register applications.
Select Register one or more applications and enter the
name,type, andURIfor the source application.Register the
dockerartifact of theHttpSourceapplication namedhttp-source, as follows:(uri =
source.http=docker:springcloudstream/http-source-rabbit:3.0.1)Click on NEW APPLICATION to display another instance of the form to enter the values for the processor.
Register the
dockerartifact of theBasicStreamProcessorprocessor application namedbasicstreamprocessor, as follows:(uri =
docker://projects.registry.vmware.com/steeltoe/basicstreamprocessor:latest)Click on NEW APPLICATION to display another instance of the form to enter the values for the sink.
Register the
dockerartifact of theBasicStreamSinksink application namedbasicstreamsink, as follows:(uri =
docker://projects.registry.vmware.com/steeltoe/basicstreamprocessor:latest)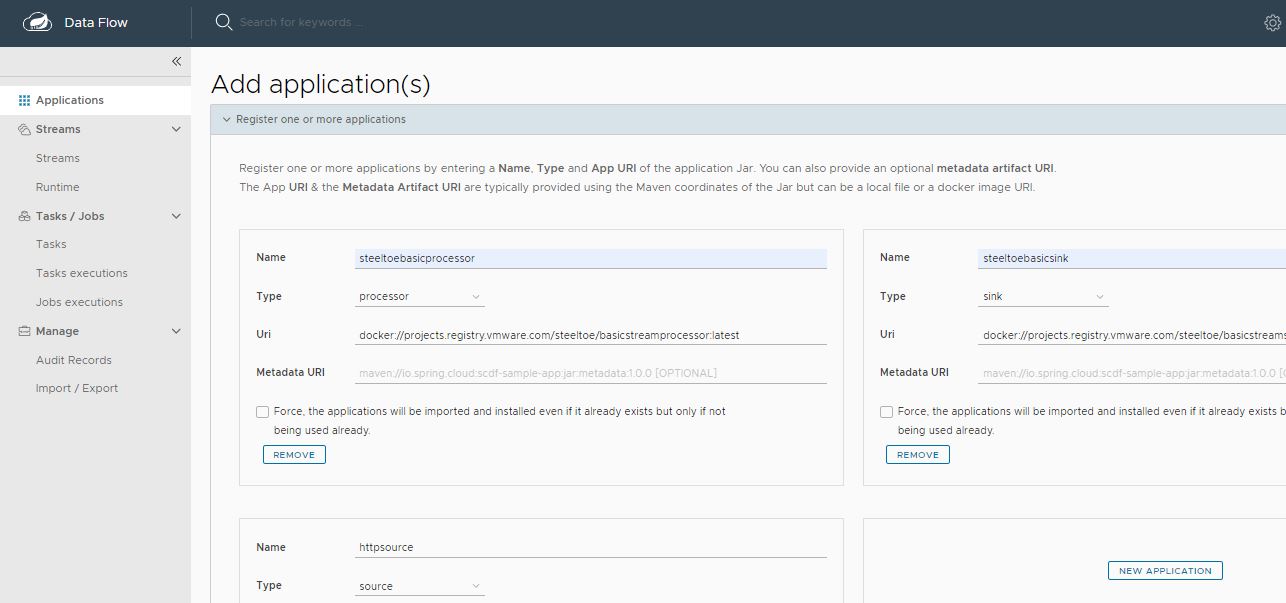
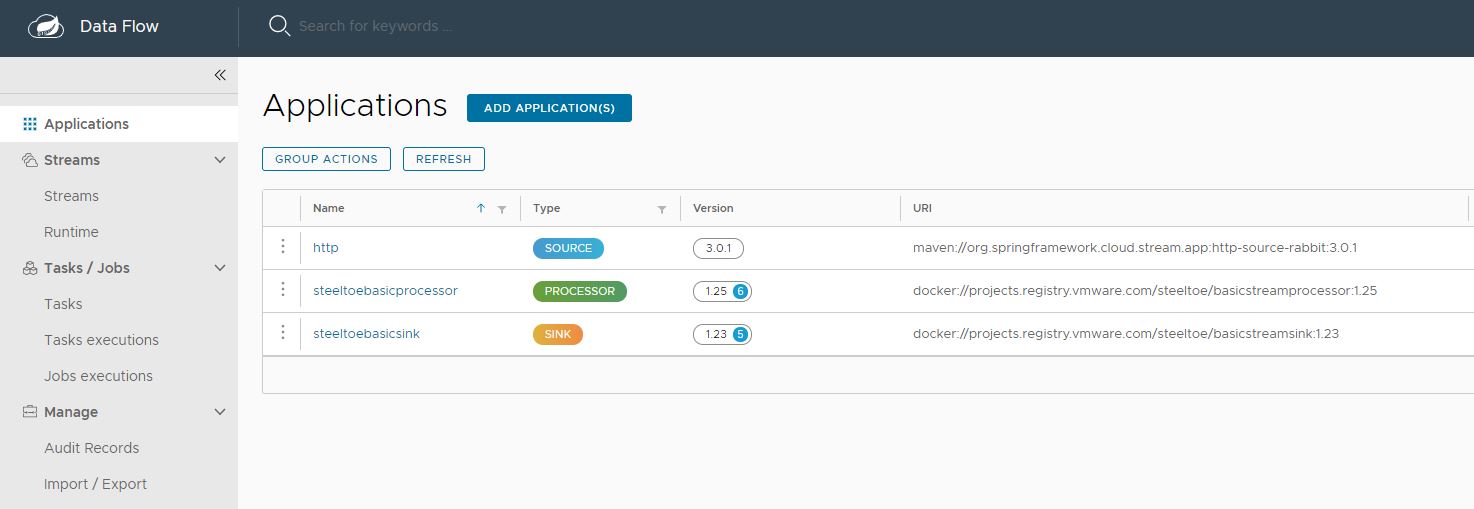
Click on IMPORT APPLICATION(S) to complete the registration. Doing so takes you back to the Applications view, which lists your applications. The following image shows an example:
Creating the Stream Definition
To create the stream definition:
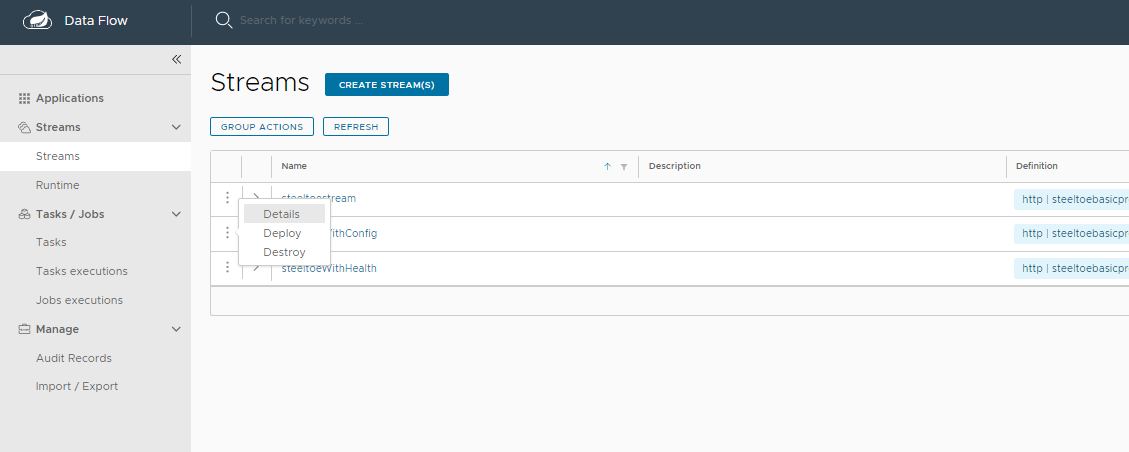
- Select Streams from the left navigation bar. This shows the main Streams view, as follows:

- Select Create stream(s) to display a graphical editor to create the stream definition, as the following image shows:
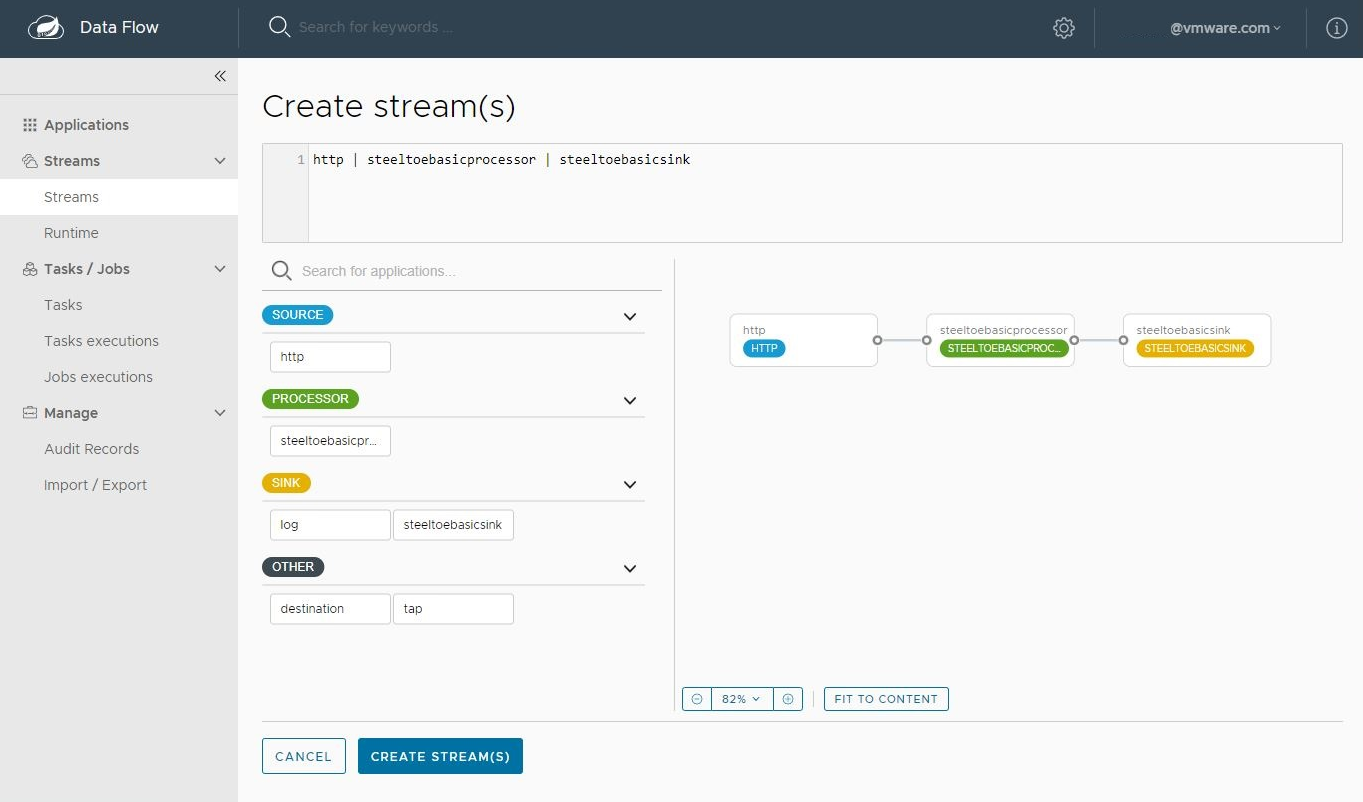
You can see the Source, Processor and Sink applications, as registered above, in the left panel.
Drag and drop each application to the canvas and then use the handles to connect them together. Notice the equivalent Data Flow DSL definition in the top text panel.
Click
Create Stream.You can type the name of the stream
basicsteeltoestreamwhen creating the stream.
Deployment
To deploy your stream,
Click on the arrow head icon to deploy the stream. Doing so takes you to the Deploy Stream page, where you may enter additional deployment properties.
Select
Deploy, as follows:
- When deploying the stream, choose the target platform accounts from local, Kubernetes, or Cloud Foundry. This is based on the Spring Cloud Skipper server deployer platform account setup.
NOTE: When deploying on K8s, .NET applications should have the application properties for the entrypoint-style set to
boot
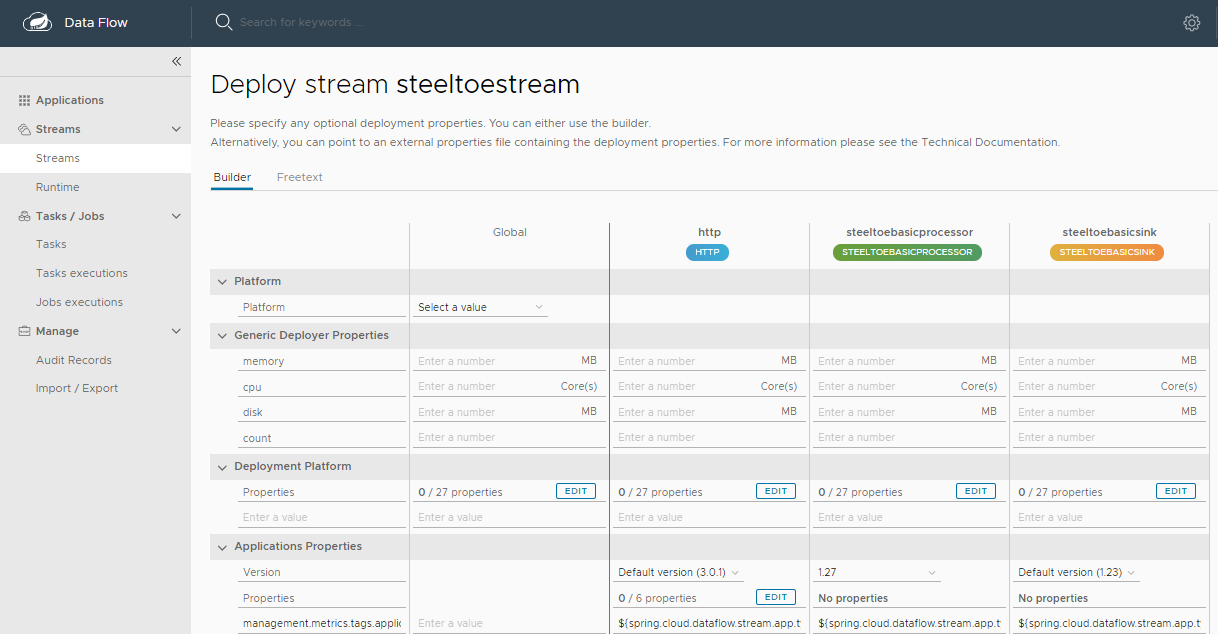
When all the applications are running, the stream is successfully deployed.
 The preceding process is basically the same for all platforms. The following sections address platform-specific details for deploying on Data Flow on Cloud Foundry and Kubernetes.
Cloud Foundry
Before registering and deploying stream applications to Cloud Foundry by using the instructions shown earlier, you should ensure that you have an instance of Spring Cloud Data Flow running on Cloud Foundry. Follow the Cloud Foundry installation guide for reference.
Once you have followed the steps shown earlier in this chapter and have registered the applications as well as deployed the stream, you can see the successfully deployed applications in your in your Org and Space in Cloud Foundry.

You can access the runtime information of your stream applications in the Spring Cloud Data Flow dashboard as well.
Besides verifying the runtime status of your stream, you should also verify the logging output produced by the basicstreamsink sink. In Cloud Foundry Apps Manager, click the Logs tab of the basicstreamsink sink application.
To run data through the stream, POST data to the HttpSource application using a client such as Httpie and verify the logs for the transformed output.
http --json POST https://mkzmlko-steeltoestream-http-v1.apps.pcfone.io/ test=data
The logging statements should look like the following:

Kubernetes
Once you have the Spring Cloud Data Flow server running in Kubernetes (by following the instructions from the installation guide), you can:
- Register the stream applications
- Create, deploy, and manage streams
Registering Applications with Spring Cloud Data Flow server
For the Http source, use the following:
docker:springcloudstream/http-source-rabbit:3.0.1
For the BasicStreamProcessor processor, use the following:
docker://projects.registry.vmware.com/steeltoe/basicstreamprocessor:latest
For the BasicStreamSink sink, use the following:
docker://projects.registry.vmware.com/steeltoe/basicstreamprocessor:latest
You can register these applications, as described in the application registration step described earlier.
Stream Deployment
Once you have registered the applications, you can deploy the stream per the instructions from the stream deployment section above.
Listing the Pods
To lists the pods (including the server components and the streaming applications), run the following command (shown with its output):
kubectl get pods
NAME                                                         READY   STATUS    RESTARTS   AGE
scdf-release-mariadb-0                                        1/1     Running   0          4d
scdf-release-rabbitmq-0                                       1/1     Running   0          4d
scdf-release-spring-cloud-dataflow-server-5c794bfb6b-n9fql    1/1     Running   0          4d
scdf-release-spring-cloud-dataflow-skipper-7d69cb747c-mwjj6   1/1     Running   0          4d
steeltoestream-http-v2-ff96445b9-8p2fl                        1/1     Running   0          3m12s
steeltoestream-steeltoebasicprocessor-v2-78974485d9-66w55     1/1     Running   0          3m12s
steeltoestream-steeltoebasicsink-v2-5fd5c84448-f2w5b          1/1     Running   0          3m12s
Verifying the Logs
To be sure the steps in the previous sections have worked correctly, you should verify the logs. To run data through the stream you can POST data to the HttpSource application using a client such as Httpie and verify the logs for the transformed output.
The following example (shown with its output) shows how to make sure that the values you expect appear in the logs:
kubectl port-forward --namespace default svc/steeltoestream-http 8081:8080

http --json POST http://localhost:8081 "test=data"

kubectl logs steeltoestream-steeltoebasicsink-v2-5fd5c84448-f2w5b
info: Steeltoe.Stream.Binder.Rabbit.RabbitMessageChannelBinder[0]
      Channel 'steeltoestream.steeltoebasicprocessor.steeltoestream.errors' has 1 subscriber(s).
info: Steeltoe.Stream.Binder.Rabbit.RabbitMessageChannelBinder[0]
      Channel 'steeltoestream.steeltoebasicprocessor.steeltoestream.errors' has 2 subscriber(s).
info: Microsoft.Hosting.Lifetime[0]
      Application started. Press Ctrl+C to shut down.
info: Microsoft.Hosting.Lifetime[0]
      Hosting environment: Production
info: Microsoft.Hosting.Lifetime[0]
      Content root path: /app
info: CloudDataflowSink.Program[0]
      sink: {"TEST": "DATA"}
Comparison with Standalone Deployment
In this section, we deployed the stream by using Spring Cloud Data Flow with the stream DSL:
http | steeltoebasicprocessor | steeltoebasicsink
When these three applications are deployed as standalone applications, you need to set the binding properties that connect the applications to make them into a stream.
Instead, Spring Cloud Data Flow lets you deploy all three streaming applications as a single stream by taking care of the plumbing of one application to the other to form the data flow.